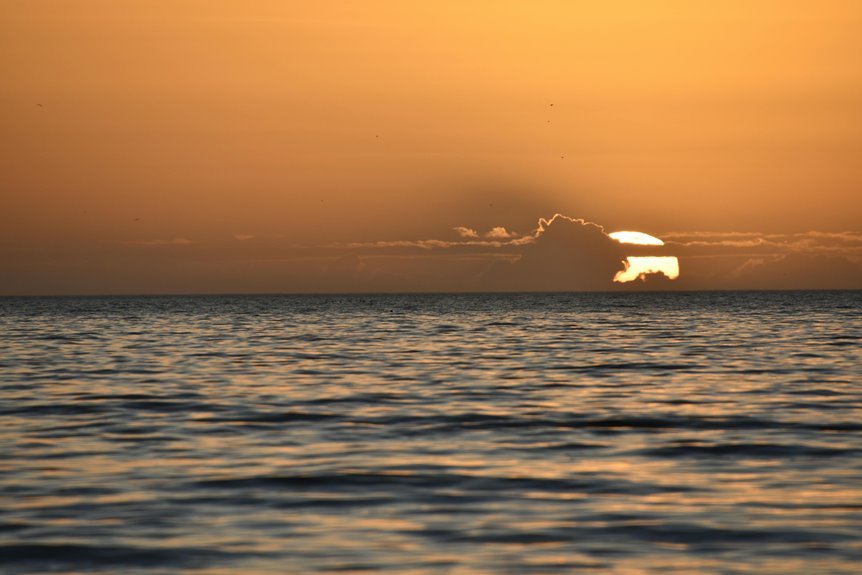
Great sunrise and sunset photos come from a little planning and a steady approach. Check the forecast and sun position, get there early, and use a tripod for sharp shots. Add foreground details and layers to give the scene more depth, then expose carefully to hold onto sky color. Finish with light editing so the photo stays natural and true to the moment.
Plan Your Shot Around Light and Weather
Because light changes fast at sunrise and sunset, you’ll get better photos provided you plan before you even lift the camera.
Start upon checking weather patterns, because thin clouds often glow while heavy overcast can mute color. You’ll feel more confident once you know what the sky could do.
Next, study how the light temperature shifts through the window of dawn or dusk. Warm tones usually peak briefly, then fade into softer pastels.
In case you know that rhythm, you can choose the moment that fits your style and still feel part of the photographers who chase this magic together.
Also, bear in mind where the sun will rise or set, so you can build a stronger frame around the changing light. Give yourself extra time before and after the brightest color for surprises.
Arrive Early to Scout the Scene
Arrive ahead of schedule, and you’ll give yourself time to spot strong foreground elements like rocks, trees, or reflections that make your photo feel complete.
As the light shifts, you can check where the sun will rise or set and see how that direction shapes shadows, color, and depth in the scene. With that head start, you can choose the best camera position before the best light fades, so you’re ready at the moment finally comes.
Assess Foreground Elements
The best foregrounds often reveal themselves as you give the scene a little time and attention. Upon arrival ahead of schedule, you can walk the area, slow down, and notice what belongs in your frame. Look for rocks, grasses, tide pools, driftwood, flowers, fences, or winding paths that pull viewers inward and make them feel present with you.
As you assess the foreground, avoid distractions like bright trash, messy branches, footprints, or cut-off objects near the edge. Then choose textures that add character, such as wet stones, rippled sand, cracked earth, frost, or weathered wood.
Try a lower angle to make those details feel stronger and more welcoming. Provided water is nearby, check for reflections that connect the foreground to the wider scene. Small changes in position can turn an ordinary view into one your community will love.
Check Light Direction
While the sky still looks quiet, you can learn a lot through watching where the light will fall across the scene. Arriving promptly helps you read the terrain before color peaks.
You start to notice the sun azimuth, the angle where the sun will rise or set, and how that changes the mood across hills, water, and trees.
As the light builds, study shadow direction on the ground, rocks, and branches. Those shadows show whether sidelight will reveal texture or flatten it.
You also see which areas will glow initially and which will stay dark longer. That knowledge helps you feel ready, not rushed, and that’s at which stronger images begin.
Whenever you scout this way, you join the rhythm of the place, almost like the land is letting you in on a shared secret.
Plan Camera Position
Once you know where the light will fall, you can choose a camera position that gives that light something meaningful to work with. Arrive ahead of time, so you can walk the area with calm focus and feel part of the place. Look for rocks, grasses, water, or trees that can anchor the scene and guide the eye.
Then test your framing viewpoint before color peaks. Move left or right to clean up clutter. Change camera height to control how strong the foreground feels. Crouch low for texture and depth, or raise the camera to simplify the view. Turn around too, because the best glow sometimes lands behind you.
As you settle in, notice where reflections, lines, and shadows lead. That small scouting window helps you belong in the environment and catch the moment with confidence and joy.
Use a Tripod for Sharp Low-Light Photos
Because sunrise and sunset light is beautiful but faint, a tripod gives you the steady support you need once shutter speeds slow down and even a tiny hand movement can blur the shot. It helps you keep stable framing while your camera gathers more light, so your scene stays crisp and calm instead of soft and shaky.
Just as crucial, a tripod improves vibration reduction whenever you press the shutter or adjust settings. You’ll feel more confident because your setup works with you, not against you.
Use a timer, remote, or your camera’s delay mode to cut extra movement. In case your tripod has a center hook, hang a small bag for added steadiness in light wind. Extend thicker leg sections initially, lock everything firmly, and you’ll come home with cleaner files your fellow photographers will admire.
Create Depth in Sunrise and Sunset Scenes
To make your sunrise or sunset photo feel deeper, place strong foreground elements like rocks, trees, or shoreline textures close to your lens.
Then let distant hills, water, or clouds fade softly into the background, because that atmospheric haze helps you show space in a natural way.
Whenever you combine sharp front details with softer far-off layers, you give your scene a richer, more immersive feel.
Layer Foreground Elements
During the moment you layer strong foreground elements into your sunrise or sunset photo, the scene stops feeling flat and starts pulling the viewer in. You give people a place to enter the image, and that creates a sense of connection. Start with rocks, grasses, driftwood, or flowers close to your lens. Then place hills, water, or trees beyond them so each part supports the next.
As the light grows softer, look for foreground patterns and layered textures that catch sidelight. Those details help your photo feel rich and welcoming, like a place your viewer could step into with you. Move a few feet left or right, crouch lower, or raise your camera until the shapes feel balanced.
In case a foreground object feels messy, simplify it. Strong layers make your sunrise or sunset scene feel alive.
Use Atmospheric Perspective
During the period the sun sits low and the air fills with haze, mist, or fine dust, you can use that natural softness to make your sunrise or sunset scene feel deeper and more real. Look for layers. Place a sharp subject close to you, then let hills, trees, or ridges fade as they recede into atmospheric haze. That gradual loss of contrast helps your image feel welcoming, like a place you could step into with friends.
As the light changes, watch the color gradient across the scene. Warm tones often stay stronger in the foreground, while distant forms shift cooler and lighter. Use that change to separate each layer.
Keep your composition simple, and give each distance zone room to breathe. At the moment you do, your photo feels connected, calm, and beautifully shared with everyone.
Add Foreground Interest to Your Landscape
Bring your scene to life through placing a strong foreground element near the camera, because a sunrise or sunset photo feels far more immersive once it has depth, scale, and a clear path for the eye to follow. You can use rocks, grasses, driftwood, or tide pools to welcome viewers in. Get low, move close, and let texture details stand out while silhouette shapes stay clean against the glow.
| Foreground choice | Visual effect |
|---|---|
| Rocks or logs | Add scale and stability |
| Water or sand ripples | Create texture and leading lines |
As you refine composition, watch how the foreground connects with distant hills, clouds, or reflections. That link makes your image feel like home, not just a pretty sky. In the event that one object feels messy, shift your position a little. Small changes often create a stronger, more inviting frame.
Expose for Better Sky Color
How do you keep those rich sunrise and sunset colors from turning into a pale, washed-out sky? You expose for the brightest part initially. In case the sky looks good, the color stays deep and true, and your photo feels like the moment you shared with everyone else out there.
Commence by lowering exposure a little instead of trusting your camera to guess. Then use histogram monitoring to check whether highlights are clipping on the right side. Should they be, pull back more.
Because sunrise and sunset scenes hold strong contrast, exposure bracketing gives you a safer path. Capture one frame for the sky, one for the middle tones, and one for darker land. This helps you protect color while keeping options open.
With practice, you’ll feel more confident, and your skies will finally look like they belong.
Edit Sunrise and Sunset Photos Naturally
Even even though the scene looked wild in person, your edit should protect that feeling instead of pushing every color to the edge. Start with white balance, then lift shadows gently and recover highlights so the sky still glows. Avoid excessive saturation, because sunrise warmth already carries emotion. Keep contrast soft enough to hold detail in clouds, water, and foreground textures. Then zoom in and check edges, because heavy sharpening can make a peaceful frame feel brittle.
| Tool | Use | Watch |
|---|---|---|
| White balance | Keep warmth honest | Orange skin tones |
| Highlights/shadows | Hold sky and terrain | Flat contrast |
| Sharpening/color | Add crispness carefully | Halos, neon color |
As you edit, trust the memory of the light. You want your photo to feel like the moment your community of scenery lovers knows firsthand.
Frequently Asked Questions
How Do I Protect My Camera From Sea Spray at the Coast?
Use a rain cover or waterproof housing and fit a lens hood because salt spray can damage a camera quickly. Wipe the front element often, turn your body to shield the camera from the wind, and keep several clean microfiber cloths ready.
Which Focal Length Works Best for Sunrise and Sunset Landscapes?
Sunrise and sunset landscapes often work best at 16 to 35mm, since a wide angle lets you include more sky, foreground, and color. A longer focal length is useful when you want compressed layers of hills or a larger looking sun. Both options can produce strong results depending on the scene.
Should I Shoot RAW or JPEG for Golden Hour Photography?
Shoot RAW during golden hour if you want more control over the final image. RAW files let you recover bright skies, fine tune white balance, and shape the warm light with greater precision in editing.
How Can I Avoid Lens Flare When Photographing Into the Sun?
Use a lens hood, keep the front element clean, and shift your position a few degrees to move flare out of the frame. Remove extra filters that can add reflections, block stray light with your hand or a flag just outside the shot, and use a polarizing filter only after checking whether it creates uneven darkening or new reflections.
What Safety Essentials Should I Bring for Remote Sunrise Shoots?
Pack insulated layers, extra headlamp batteries, water, high energy snacks, a fully charged phone, offline navigation, a compact first aid kit, sturdy boots, and an emergency blanket. These items help you handle cold, low light, rough terrain, and unexpected delays during a remote sunrise shoot.