Camera modes are the different settings that control how your camera handles light, focus, and motion. Auto works for quick snapshots, while Program gives a bit more control without much effort. Aperture Priority helps you shape background blur, and Sports or Night modes fit fast action or low light. Picking the right mode helps your photos look sharper and more intentional.
What Camera Modes Do
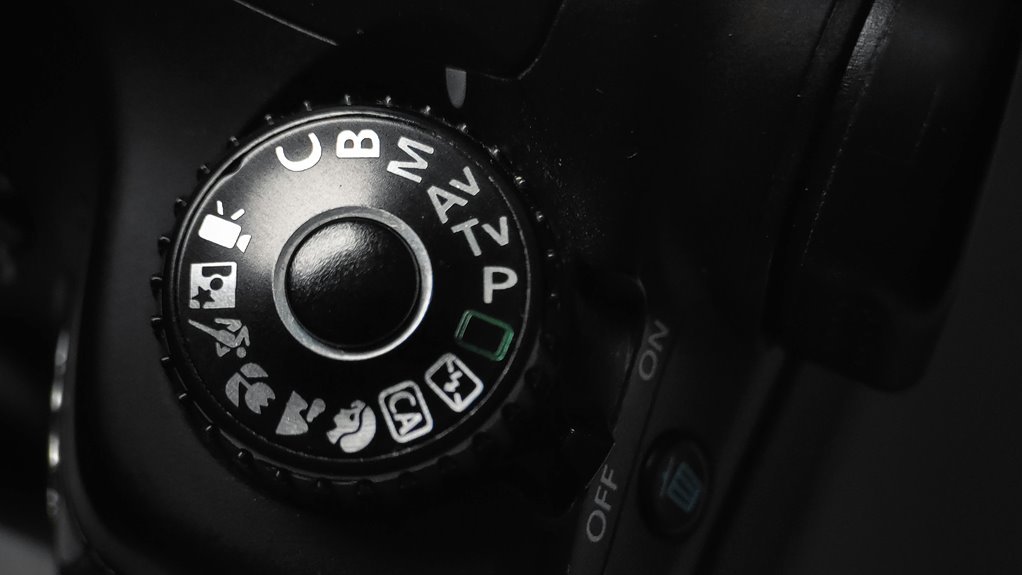
Camera modes help you choose how much control you want over the shot, and that can make photography feel a lot less confusing. You’re not just picking letters on a dial; you’re choosing the mode functionality that fits the moment.
In Auto, the camera handles exposure and color for you, which gives you strong shooting automation whenever you want to stay quick and relaxed. Program, Scene, and the priority modes shift more of the work between you and the camera, so you can guide the look without doing everything manually.
Manual puts the whole setup in your hands. Each mode changes how the camera processes, so you can focus on the scene, not the stress. That’s pretty handy whenever you want to feel like you belong behind the lens.
How to Choose the Right Camera Mode
During the moment you’re choosing the right mode, start with what you want the camera to do for you, not with the dial itself. In case you want quick balance, try Program mode. Provided you want to guide depth, use Aperture Priority. For motion, Shutter Priority helps you stay in control. Whenever scenes get tricky, Manual mode gives you the full say.
Then check your subject, light, and comfort level. A portrait might need a soft background, while a game needs speed.
Also, make sure sensor calibration is current and lens compatibility is solid, so your choices behave as expected.
You’re not behind on the off chance you start simple. The best mode is the one that lets you shoot with confidence and feel like you belong behind the camera.
Auto Mode for Quick Everyday Shots
Auto Mode is the easiest way to grab quick everyday shots because your camera handles the hard parts for you. It sets exposure, white balance, and other settings on its own, so you can stay focused on the moment instead of the menu.
It’s a smart choice whenever you want reliable results fast, especially for casual photos, family scenes, and those blink-and-you’ll-miss-it moments.
Fast Point-And-Shoot
In case you simply want to catch a moment without slowing down, Auto Mode is the easiest place to start. You can lift the camera, frame the scene, and let it do the reasoning for you. That makes quick snaps feel easy, especially during spontaneous shooting with friends, kids, or street life.
| What you do | What the camera handles |
|---|---|
| Aim | Focus and exposure |
| Press | Shutter timing |
| Move fast | Scene detection |
| Smile | Color and balance |
This simple setup helps you stay in the moment and feel part of the action instead of stuck adjusting settings. Whenever life moves quickly, you can keep up and still come home with a photo that feels like you were there.
Reliable Exposure Balance
In case you just want a solid photo without fuss, Auto Mode gives you that quiet kind of confidence. You stay in the moment, and the camera handles aperture, shutter speed, ISO, and white balance for you.
That means your family, your coffee cup, or your rainy street scene can look balanced without you juggling settings.
- You raise the camera and frame the shot.
- The camera reads the light.
- It checks metering patterns to guide exposure.
- It settles on a clean result, with exposure compensation ready provided the scene feels too bright or too dark.
Best Times To Use
At what point do you reach for the simplest setting? As soon as you want to stay present and still bring home a clear photo, Auto Mode is your friend.
You can use it for birthday parties, school plays, outdoor events, or busy family walks whenever light keeps changing. It also helps with indoor portraits in case you’re unsure about flash or room light. Your camera handles aperture, shutter speed, ISO, and white balance, so you can focus on the moment, not the menu.
That ease matters whenever people are moving fast and you don’t want to miss the smile. It’s also handy once you’re learning your camera and need a steady, no-stress starting point.
Program Mode for Easy Guided Control
Program mode, marked with a simple P on your camera dial, is a great middle ground should you want help without giving up control. You get guided exposure, while the camera picks the basic shutter and aperture pair. That means you can stay focused on the moment and still enjoy user flexibility.
Picture it like this:
- A busy street, where light keeps changing.
- A family trip, where smiles happen fast.
- A market stall, full of color and motion.
- A rainy afternoon, with soft gray light.
Then you can tweak ISO, exposure compensation, or white balance to match your scene. So, you’re not stuck in fully automatic mode, and you’re not left doing everything alone either. It’s a friendly choice whenever you want to belong behind the camera.
Aperture Priority for Blurry Backgrounds
Ever contemplate why some photos have a soft, dreamy background while the subject stays sharp and clear? With aperture priority, you choose the f-stop, and your camera handles the shutter speed.
As you open the aperture wider, more light enters and the background melts away, which helps you create bokeh effects that feel gentle and polished.
This mode works best whenever you want your subject to stand out, like a friend at a café or a flower in a busy garden.
Your lens selection matters too, because some lenses make blur look smoother and creamier. You can also adjust ISO and exposure compensation to keep the image bright.
It’s a simple way to get creative control without feeling alone with the settings.
Shutter Priority for Fast Motion
Shutter Priority lets you freeze motion through choosing a fast shutter speed, so you can stop a runner, a bird, or a splash in a sharp instant. You set the speed you want, and your camera handles the rest, which takes a lot of stress out of fast action.
In case your subject keeps moving, you can also try panning with it, so the background blurs while your subject stays clear.
Freezing Motion
At the moment you need to freeze a split-second moment, shutter priority can be your best friend. You set the pace, and the camera does the rest.
When a runner leaps or a dog shakes off rain, you want crisp detail, not motion blur from a slow shutter.
- Envision a child mid-jump, frozen in bright air.
- Visualize a soccer ball hanging before the kick lands.
- See water drops suspended like tiny glass beads.
- Feel the thrill as every sharp edge stays clear.
Because your shutter choice controls motion, this mode helps you stay in the moment with your people, your game, and your story. It’s a simple way to catch action without the guesswork.
Choosing Fast Shutter Speeds
Fast action asks for a fast eye, and that’s where Shutter Priority starts to shine. You set a quick shutter speed, and your camera handles the rest, so you can stay focused on the moment.
Should a runner, dancer, or dog bursts into frame, a faster setting helps cut motion blur and keeps edges crisp. It also helps reduce shutter lag, so your shot feels more responsive whenever timing matters. Start around 1/500 second for lively subjects, then go faster should the action still looks soft.
In this mode, you’re not fighting the camera. You’re teaming up with it. That little shift can make you feel ready, steady, and part of the scene instead of chasing it.
Panning With Moving Subjects
In case you want a subject to look like it’s gliding cleanly through the frame, panning can turn a busy shot into a strong one. You follow the moving person, bike, or car with your camera, then use Shutter Priority so you can hold a slow enough speed for motion blur while keeping the subject sharp.
It takes a little practice, but you’re not alone should your initial tries feel wobbly.
- Stand with your feet steady and turn your upper body.
- Match the subject’s speed before you press the shutter.
- Keep tracking after the click to protect smooth background streaks.
- Begin with a faster car, then try a runner.
When you time it right, the scene feels alive, and your shot feels like it belongs in the moment.
Manual Mode for Full Control
Manual mode gives you the most direct control over your camera, and that can feel a little intimidating initially, but it’s also where the real freedom starts. You’re steering the exposure triangle, so you shape light with aperture, shutter speed, and ISO instead of waiting for the camera to decide. That means you can brighten a dim room, freeze a splash, or keep a cozy glow just right. Manual focusing can help too in case the scene is tricky and you want every detail to land where you expect.
| Control | Effect |
|---|---|
| Aperture | Soft background or deep detail |
| Shutter speed | Crisp motion or blur |
| ISO | Brighter image or more grain |
| Focus | Sharp subject placement |
Portrait Mode for Flattering Photos
Portrait mode is one of the easiest ways to make a person look polished, even although the light isn’t perfect or the background is a little messy. It helps you feel like you belong in the frame, not stuck outside it.
Use these pose guidance and lighting tips to keep things natural:
- Turn one shoulder toward the camera.
- Ask them to relax their hands.
- Place the face near soft window light.
- Step back so the camera can blur clutter.
With portrait mode, your camera softens the space behind the person and keeps attention on the eyes. You don’t need fancy gear, just a calm moment and a steady hand.
In case the initial shot feels stiff, try one tiny change. That’s often all it takes to get a photo that feels warm, honest, and shareable.
Landscape Mode for Sharp Scenery
Horizontal mode helps you turn a wide scene into a crisp, inviting photo, so the mountains, trees, or skyline don’t feel cramped. You fit more into the frame, and your shot starts to feel like the place you stood in.
For the cleanest result, keep the horizon level and use a small aperture for deep detail across the scene. That helps your camera hold sharp focus from the foreground to the distance. You can also lower your ISO so textures stay clear and natural.
Should your camera have terrain scene mode, it fine-tunes color and contrast for you, which is handy whenever you want confidence fast. So, whenever you’re chasing a view worth sharing, this mode helps you make it look steady, open, and welcoming.
Night Mode for Low-Light Photos
As the light starts to fade, Night Mode can help you save the moment instead of losing it to blur and darkness. You’ll feel more confident whenever your camera slows down and gathers more detail in low light, so faces, lamps, and city colors stay clear.
It often raises ISO sensitivity and uses longer shutter times, which means you might want to hold still and breathe easy.
- Frame your subject near a warm streetlight.
- Keep both elbows tucked in.
- Let the camera catch glowing windows.
- Watch shadows turn soft, not muddy.
Because Night Mode does the heavy lifting, you can stay part of the scene, not stuck fighting settings. It’s a small trick, but it can make your nights feel shareable, cozy, and a little magical.
Sports Mode for Fast Action
Sports mode helps you freeze quick movement with fast shutter settings, so you’re less likely to get blurry shots as the action speeds past.
You can also keep your camera ready to track moving subjects, which makes it easier to follow runners, kids, or pets in motion. For the best results, use it in bright light, since faster shutter speeds work best once the scene gives you enough light to stay sharp.
Fast Shutter Settings
At the moment the action gets fast, your camera needs a quick shutter speed to freeze the moment before it blurs away. You belong in control here, even though the play feels wild.
Fast settings cut shutter lag and lower exposure latency, so your shot fires as soon as you mean it to. That matters whenever the subject is darting, jumping, or spinning.
- Choose a higher shutter speed for crisp edges.
- Keep your stance steady, like you’re rooted to the floor.
- Watch the light, because faster speeds need more brightness.
- Press the shutter with confidence, not panic.
With these settings, you’re ready to catch clean, sharp action that feels exciting and real.
Tracking Moving Subjects
As the action won’t stay still, you need more than a fast shutter, because tracking moving subjects is what helps you keep the moment in focus while everything else rushes past. You’re not chasing luck here; you’re joining the play. Use continuous autofocus so your camera keeps adjusting as the person, bike, or ball moves. Then lean on subject tracking to hold the target as it crosses the frame.
| Setting | Why it helps | What you do |
|---|---|---|
| Continuous autofocus | Stays sharp | Keep half-pressing |
| Subject tracking | Follows motion | Place focus on target |
| Burst shooting | Captures options | Take several frames |
| Simple framing | Reduces clutter | Give space ahead |
With practice, you’ll feel steadier, and that confidence shows in your shots.
Best Light Conditions
As soon as the light is right, Sports mode can feel almost effortless, because your camera gets the speed it needs to freeze the action without you wrestling with every setting.
You’ll get the cleanest results in bright natural light, especially when the field feels open and the sky stays clear. Around golden hour, the softer glow can still work provided your subject stays well lit. Try to envision:
- A soccer player sprinting through sunlit grass
- A skateboarder catching air near a bright wall
- A runner crossing a golden path at dusk
- Kids leaping under open sky
Whenever the light drops, your camera might slow down and blur the moment. So you’ll fit in better with the crowd of sharp, confident shots when you choose lively light that keeps the action crisp.
Common Camera Mode Mistakes
Even the best camera mode can feel confusing should you be still learning what each one actually does, and that’s where many common mistakes start. You could jump between Auto, P, A, or M without understanding why, and that mode confusion often leads to incorrect settings that spoil good moments.
For example, you might trust Auto too much, then miss the chance to shape focus or motion. Or you might pick Manual when the scene keeps changing, and then you feel stuck instead of steady.
It helps to keep in mind that each mode has a job. Whenever you match the mode to the moment, you’ll feel more confident, more in control, and a lot less alone behind the camera.
Camera Mode Settings to Practice First
In case camera modes have felt like a guessing game, the best place to start is with the settings you can practice in simple, repeatable scenes. Start with basic mode, then move to beginner settings that let you watch what changes.
- Set Auto for a bright window and see how the camera reacts.
- Try Program in a park and notice how it keeps exposure steady.
- Use Aperture Priority on a face to watch the background soften.
- Switch to Shutter Priority for a bike or running child, so motion feels clear.
These steps build trust fast. You’re not falling behind; you’re learning the camera’s language. Once you repeat the same scene, each dial move makes more sense, and that feels pretty great.
Frequently Asked Questions
Which Camera Mode Is Best for Beginners Learning Exposure?
Aperture priority is a strong starting point for learning exposure. You set depth of field, and the camera selects shutter speed. Many beginners find it the quickest way to understand the relationship between aperture and brightness. Later, you can move on to manual metering when you want full control.
Can I Switch Modes While Recording Video?
Usually, you cannot switch modes while video is recording. You need to stop recording first, then begin again in the new mode. Some cameras allow a few settings to be changed during recording, so you still have some control. Check your camera manual for exact details.
Does Changing Mode Affect Image Quality?
Changing modes usually will not transform your image quality by itself. The sensor stays the same, but sensitivity, white balance, and image processing can change. It gives you more control, not more raw capability.
What Does Exposure Compensation Do in Different Modes?
Exposure compensation lets you brighten or darken the image without changing your core settings much. In Auto, Program, and Scene modes, it directly changes the exposure level. In Aperture, Shutter, or Manual modes, its effect may be limited depending on the camera.
Why Does My Camera Sometimes Lock Certain Settings?
Your camera may lock certain settings because the shooting mode you selected has built in limits and firmware rules. It protects exposure controls and helps keep results consistent, so you can shoot with confidence without adjusting every option.