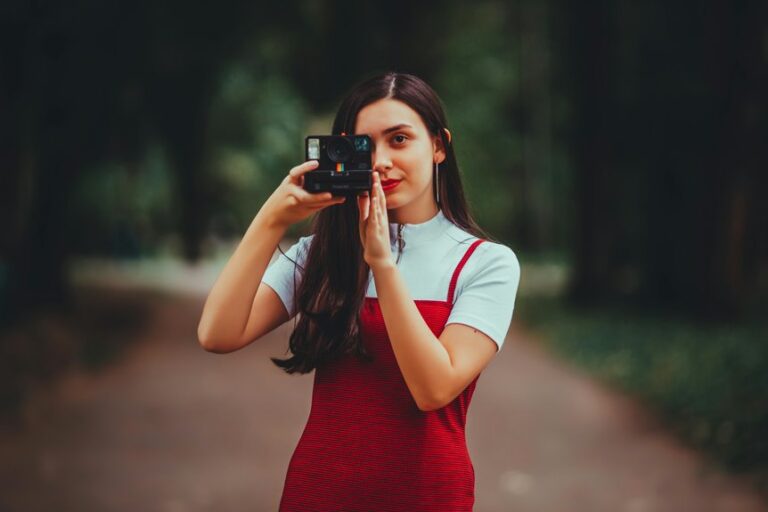
Great portrait settings start with raw, low ISO, accurate white balance, and eye autofocus. Use a wide aperture with enough control to keep the eyes sharp and the skin looking natural. Face-based metering helps keep exposure steady across different skin tones and lighting setups. Get these core settings right, and your portraits will look cleaner, sharper, and far more true to life.
Start With a Portrait Settings Baseline
As you’re setting up for a portrait, start with a simple baseline that gives you clean skin tones, clear focus, and room to adjust as the light changes.
Begin with raw capture, a low ISO, and a wide aperture that still keeps both eyes sharp. Then set your shutter fast enough to stop movement, because even a small sway can soften a face.
Next, check exposure and aim near the meter’s center or slightly under so skin keeps detail and glow. This creates a starting point you can trust.
From there, use camera calibration to keep your files consistent, especially in case you’re sharing a look across sessions. Also follow framing guidelines so faces feel balanced and welcoming in the frame.
Once your setup feels steady, you’ll work with more confidence, and your subject will too.
Set White Balance for Natural Skin Tones
To keep skin tones looking real, you should start through choosing the white balance mode that best matches your light.
In case the presets don’t look quite right, you can adjust the Kelvin temperature to warm up or cool down skin in a natural way.
Even when you shoot raw for extra editing freedom, getting white balance close in camera helps you judge color with more confidence.
Choose White Balance Mode
Why does white balance matter so much in portraits? It keeps skin from looking too blue, yellow, or gray, so your subject feels real and warmly seen. Whenever you choose the right mode, you’re giving every face a fair, natural starting point.
| Mode | Best use |
|---|---|
| Auto WB | Mixed light, quick changes |
| Daylight | Outdoor sun |
| Shade | Cool open shade |
| Cloudy | Soft, warm overcast light |
Start with preset options that match the light around you. They help you stay consistent, especially during a session as everyone wants to feel comfortable and confident. In case skin still looks off, use custom calibration for a more faithful result. And should you shoot raw, you’ll have room to refine later, while still getting a trustworthy preview in camera for your portraits.
Adjust Kelvin Temperature
Preset white balance modes give you a fast starting point, but Kelvin temperature gives you finer control as skin still looks a little too cool or too warm.
Once you adjust color temperature yourself, you help faces look true, warm, and welcoming. That matters whenever you want portraits to feel real and connected.
- Start around 5200K in daylight, then nudge higher for warmer skin.
- In case indoor light turns skin orange, lower Kelvin until tones look calm and natural.
- Watch for green or magenta shifts, then correct with white tint so complexion stays balanced.
- Shoot raw, because you’ll have room to refine later, while still getting close in camera now.
As you practice, you’ll trust your eye more. Soon, your portraits will feel like your people, seen in the best light.
Set Exposure for Flattering Skin
At the time you set exposure for portraits, your initial job is to protect skin highlights so bright areas don’t turn flat and harsh.
You’ll get better results once you meter for the face, then keep the reading at 0 or just under so skin still looks soft, real, and bright. From there, you can balance brightness gently, which helps your subject look glowing instead of washed out.
Protect Skin Highlights
Although bright, glowing skin looks beautiful in a portrait, the real goal is to keep the light from washing out the face. You want your subject to look like they belong in the frame, not lost in a patch of brightness.
Protecting highlights keeps skin texture visible and helps every tone feel honest, soft, and welcoming.
- Watch for highlight clipping on cheeks, forehead, and nose where light piles up fast.
- Lower exposure slightly whenever bright areas start looking flat or detail begins to disappear.
- Check your preview and zoom in, because smooth skin should still hold gentle pores and shape.
- Use soft light at times, since kinder light makes it easier for you to keep glow without losing detail.
That balance gives portraits a warm, natural feel your subject will love and trust.
Meter For Faces
How do you make skin look bright, soft, and real all at once? You meter for the face initially. That choice helps your subject feel seen, and it gives you a portrait that looks welcoming, not harsh.
Use spot metering on the cheek or forehead where the light is clean and even. Then watch your exposure scale and aim near 0 or slightly under, so skin keeps its natural glow and texture.
If your camera offers highlight prioritization, turn it on whenever bright areas on skin start to look chalky. It can protect delicate tone while you still expose for the person, not the whole scene.
In mixed light, keep checking the face instead of the background. That small habit helps you create portraits people feel good stepping into together, every single time.
Balance Brightness Gently
Getting the meter on the face is your starting point, and then you shape the brightness with a gentle hand so skin stays bright, soft, and real. From there, you’re not chasing perfection. You’re protecting tone, texture, and the feeling that your subject belongs in the light.
- Keep exposure at 0 or slightly under for flattering skin.
- Watch bright cheeks and foreheads for overexposure avoidance.
- Lower ISO initially when light gets too strong, so detail stays clean.
- Check your preview for highlight retention, especially on lighter skin.
This small adjustment connects directly to the face metering you just made. Whenever you expose with care, you keep the glow without losing texture. Your portraits feel welcoming, honest, and polished.
That balance helps everyone in front of your camera feel seen, comfortable, and beautifully themselves.
Set Aperture for Blur and Sharp Eyes
At the moment you want a soft, creamy background but still need the eyes to look crisp, aperture is the setting that does the heavy lifting.
For portraits, you’ll usually feel at home between f/1.8 and f/4, depending on your bokeh control goals and lens selection. A wider aperture gives you that gentle blur everyone loves, while still keeping your subject’s face clear once you place focus carefully.
As you move closer, depth of field gets thinner, so even tiny shifts can soften lashes and brows. That’s why stepping back a touch or stopping down slightly to f/2.8 or f/4 often gives you a safer, more natural result.
Should you want more skin detail, freckles, and both eyes sharp, f/5.6 to f/8 can feel balanced, flattering, and beautifully true to the person in front of you.
Use Eye Autofocus for Sharp Portraits
To keep your portraits crisp, turn on Eye Detection so your camera locks onto the subject’s eye instead of drifting to the nose or hair.
Then set it to prioritize the nearest eye, because that’s usually where people look initially and where sharp focus matters most. This gives you a more reliable starting point, especially while you’re shooting wide open and every bit of focus counts.
Enable Eye Detection
Precision matters most anytime you want a portrait to feel crisp and alive, and that’s where eye detection autofocus really helps. Once you enable it, your camera looks for eyes initially, so you don’t have to fight for focus.
That means stronger eye tracking, better autofocus accuracy, and more confidence during real moments. You’ll feel more in sync with your subject, which helps everyone relax.
- Turn on Eye Detection in your autofocus menu before shooting.
- Use continuous AF so the camera keeps following movement.
- Check your focus box and make sure it lands on an eye.
- Test a few frames and zoom in to confirm sharp detail.
As your portraits become more reliable, you’ll spend less time correcting misses and more time creating images that feel warm, connected, and beautifully present.
Prioritize Nearest Eye
At the moment you’re using eye autofocus, give priority to the eye closest to the camera, because that’s the point viewers notice initially and the place where sharpness feels most natural. In portraits, that small choice helps your subject feel present, warm, and real to everyone who sees the image.
Once you focus on the nearest eye, you guide attention with purpose. That matters even more whenever you’re using a wide aperture, where selective focusing creates a soft falloff across the face.
In case the farther eye is sharp instead, the portrait can feel slightly off, even whenever everything else looks good. Most cameras let you move the focus point or confirm eye selection before shooting. Take that extra second. You’ll create portraits that feel polished, inviting, and comfortably in step with what people expect.
Pick a Shutter Speed That Freezes Motion
Because even a tiny movement can soften a portrait, your shutter speed needs to be fast enough to freeze both your subject and your own hand. In case you’re handholding, start around 1/250 sec for calm poses and go faster should your subject laughs, turns, or talks.
That way, your portraits stay crisp and welcoming, not slightly smeared.
- Use 1/250 sec as your safe starting point for most portraits.
- Move to 1/500 sec or faster for kids, candid moments, or windy hair.
- In the event you go too slow, you’ll invite motion blur, especially in eyes and lashes.
- Try slow sync only whenever you want flash plus ambient light, but keep your subject still.
As you practice, you’ll feel more confident choosing speed quickly, and your portraits will look polished and true to the people in them.
Increase ISO Without Losing Skin Detail
As light starts to fade, raising your ISO can save the shot, but you don’t want that extra sensitivity to wipe out the soft texture that makes skin look real. Start from increasing ISO only as much as needed, because higher sensor sensitivity can add grain that makes faces look rough instead of natural.
To protect detail, keep your exposure balanced with a wide enough aperture and a shutter speed that still holds your subject steady. That way, you won’t need to push ISO farther than your camera handles well.
Should your camera offer noise reduction, use it gently, not heavily, so pores, freckles, and soft gradations stay believable. You’re aiming for a portrait that still feels like your person, not a plastic version of them. That careful balance helps your images feel warm, honest, and worth sharing.
Adjust Color Profiles for Better Skin Tones
Once your exposure and ISO are under control, color profile settings help shape how skin actually feels in the photo. In case you want portraits that feel warm, honest, and welcoming, your camera profile matters more than many people believe. It affects reds, oranges, and contrast, which all influence complexion.
- Start with Portrait or Neutral profiles for softer color response and gentler contrast.
- Use color calibration to keep skin from looking too pink, orange, or flat.
- Try small profile tweaking, especially lowering saturation or contrast whenever faces look heavy.
- Check skin on your screen and compare tones across frames so everyone looks consistent.
This step connects your technical settings to emotional impact. As soon as color feels right, people look like themselves, and your portraits feel easier to trust and share with others.
Adjust Settings for Indoor Portraits
As you move indoors, your camera settings need a small reset since window light, lamps, and ceiling bulbs can shift both brightness and skin color fast. Start by checking white balance, because mixed light can turn skin too yellow or too cool. Match it to the room’s ambient temperature, or set a custom balance for steadier tones.
Next, protect skin detail with gentle exposure choices. Use a wide aperture for soft background blur, but keep focus locked on the eyes. Raise ISO only as needed, and watch indoor contrast so highlights on foreheads or cheeks don’t blow out.
In case your shutter gets too slow, ask your subject to stay still for a beat. You’re creating a space where everyone looks like themselves, comfortable, clear, and confidently seen together.
Adapt Settings for Outdoor Portraits
As soon as you step outside, your settings have to react fast because sunlight can change skin tone and exposure in seconds. To keep portraits feeling true and flattering, you’ll want to stay flexible and trust what you see. Outdoor light can be beautiful, but it asks you to work with it, not against it.
- Use golden hour whenever you can, because softer light gives your group that warm, natural look.
- Try natural backlight for glow, afterward expose for skin so faces stay clean and detailed.
- Adjust white balance to match the scene, and shoot raw so you’ve got room later.
- Practice reflectors use for gentle fill, and plan wind management so hair and focus stay under control.
That way, you’ll create portraits everyone feels good being part of.
Fix Common Portrait Settings Mistakes
Even although your portrait setup feels close, a few small setting mistakes can make skin look dull, too dark, too bright, or oddly colored. In case tones seem off, check for improper whitebalance initially. Match your setting to the light, or use custom balance so everyone looks natural and included in the frame.
Next, watch exposure. Should your meter climbs too high, highlights on cheeks and foreheads vanish. Provided it drops too low, skin loses life. Keep ISO low, open your aperture with care, and expose for skin, not the background.
Then look at light quality. harsh lighting creates deep shadows and shiny hotspots that separate your subject from the warm feeling you want. Move into shade, bounce light, or soften it. Lastly, shoot raw so you can gently fix small misses later.
Frequently Asked Questions
How Should I Pose Subjects to Flatter Different Face Shapes?
Angle a round face slightly and guide the chin forward to add definition. For a longer face, use soft light from a flattering direction and keep head tilt minimal. Coach a calm expression, release tension in the shoulders, and choose a camera height that brings the features into balance.
What Lens Focal Length Is Best for Portrait Compression?
For portrait compression, a medium telephoto lens around 85 to 135mm is typically the strongest choice. If you want flatter facial features and more pronounced background compression, use a long telephoto in the 135 to 200mm range.
How Can I Help Nervous Subjects Look Natural on Camera?
Help nervous subjects look natural by lowering pressure from the start. Speak in a calm voice, give one clear instruction at a time, and keep the conversation going so silence does not make them self conscious. Use slow breathing cues, simple prompts like walking or turning toward each other, and relaxed hand placements that do not feel staged. Let them settle into small movements instead of holding stiff poses, and respond to what feels easy for them so their expressions stay genuine.
What Backgrounds Work Best for Professional-Looking Portraits?
Professional portraits look strongest against clean, distraction free backgrounds. Since people form first impressions in about 50 milliseconds, choose a setting with balanced color and a soft, subtle texture that supports the subject without competing for attention.
Should I Use Makeup Differently for Studio and Outdoor Portraits?
Yes. Makeup usually works best when adjusted for the setting. In a studio, stronger lights can emphasize shine and flatten features, so matte or soft matte foundation, controlled powder, and slightly more defined eyes, brows, and contour tend to photograph better. Outdoors, natural light is often more forgiving, so lighter coverage with a skin-like finish usually looks more natural. This is a normal part of portrait prep, not overthinking.