Shutter speed controls how long your camera sensor sees the scene. A faster setting helps freeze motion and cuts blur. Around 1/500s or quicker works well for action. You can pair that with a wider aperture, higher ISO, burst mode, and steady handling for sharper shots.
What Is Shutter Speed?
So, what exactly is shutter speed? You can consider it as the camera’s mechanical timing for how long light reaches the sensor. Whenever the shutter opens and closes, it controls sensor exposure, and that tiny window shapes how bright your image feels.
In case you’re learning photography, this can feel strange at the outset, but you’re not alone. Every camera gives you this control so you can match the moment you see. A shorter shutter speed lets in less light, while a longer one lets in more. So, you use it to balance your scene and keep your photos looking clean and intentional.
Once you get it, shutter speed starts to feel less like jargon and more like a simple tool in your hands.
How Shutter Speed Freezes Motion
At the time you want to freeze motion, you need a fast shutter speed that stops the action before it blurs.
You’ll often get the sharpest results at 1/500s, 1/1000s, or even faster at the moment the subject is moving hard and fast. That extra speed helps you catch the exact moment with crisp detail, so your photo feels clean and alive.
Freezing Fast Action
Fast action freezes best as your shutter opens and closes so quickly that motion has no time to smear across the frame. Whenever you’re chasing high speed photography moments, an extreme shutter speed gives you the edge you need.
Set speeds around 1/1000s or faster for sports, birds, or motorsports, and you’ll often catch the instant your subject feels still. Because faster shutter speeds let in less light, you might need to raise ISO or widen your aperture to keep your exposure balanced.
In case you use shutter priority mode, you can choose the speed and let the camera handle the rest. That way, you stay in control, and your team gets the shot together.
Sharpness Through Speed
A sharp photo starts with shutter speed, because it decides how long your camera sensor is exposed to movement. Whenever you choose a faster speed, you freeze action before it can smear across the frame.
That’s why 1/500s can hold a runner crisp, and 1/1000s can tame birds in flight. Should you feel a little nervous, that’s normal; every photographer does at the outset.
Use shutter priority mode, then let the camera handle exposure while you focus on timing. Watch for shutter lag, because a tiny delay can blur the moment you meant to catch.
And don’t ignore image stabilization, since it helps your hands stay steady. Together, these tools give you cleaner edges, better control, and more confidence.
How to Choose a Fast Shutter Speed
Once you choose a fast shutter speed, start considering how fast your subject moves in the frame. A bird in flight, a runner, or a speeding car will need a much quicker setting than a person standing still.
Then match that speed to the light you have, since faster shutter speeds cut light and you might need to open your aperture or raise your ISO.
Motion Speed Matters
In case you’re farther away, the same action might be easier to freeze. Watch subject distance, because it changes how big each move appears. Also, consider background clutter. A busy scene makes blur easier to notice, so you might want extra speed to keep everything feeling crisp.
Start with a faster setting for fast feet, wings, or wheels, then check the sharpest parts. Should the motion still look soft, nudge the speed up and keep going until it feels right.
Match Scene Light
Because fast shutter speeds cut down the light hitting your sensor, you can’t pick one based on speed alone. You also need to read the scene brightness before you press the shutter.
In bright sun, a 1/1000s or faster setting can still keep good lighting balance, especially should you open your aperture a bit. In shade, indoors, or at dusk, you might’ve to raise ISO or slow down slightly so your image doesn’t go too dark. That’s where your camera’s shutter priority mode helps you stay in control without feeling lost.
Watch the preview, trust your eye, and make small changes until the motion is sharp and the light feels right. You’re not guessing; you’re tuning the shot like part of the crew.
Match Shutter Speed to the Subject
A good shutter speed starts with the subject, not the camera. You pick speed through asking how fast the motion feels and how large it appears in frame. Small movement can look big through energetic magnification, so subject sizing matters too.
Should you be closer, or using a long lens, the tiniest wobble shows up fast. Use these checks:
- Measure the action: A walking person needs less speed than a jumping athlete.
- Watch the frame size: Bigger subject sizing usually needs a faster shutter.
- Test the sharpest edge: Check hands, feet, or wings for blur initially.
When you match shutter speed to what the subject is doing, you stay in control and your photos feel crisp, calm, and ready to share.
Use Burst Mode for Moving Subjects
If your subject won’t stay still, burst mode gives you a quick string of frames instead of just one lucky shot.
You can time it around the action, like a jump, a turn, or a sprint, and that extra sequence gives you a better chance of catching the sharpest moment. It’s a simple way to feel more in control whenever the motion gets messy.
Burst Mode Timing
Burst mode can be a lifesaver provided your subject won’t stay still, but timing still matters more than pure speed. You’ll get better results once you press promptly and keep your eye on the move, not the click.
Try these timing intervals so your burst matches the action:
- Start just before the peak moment.
- Hold through the motion, then release.
- Review for frame overlap and adjust.
That way, you’re not wasting shots on awkward steps or half-blinks. Instead, you’re building a small safety net of frames that helps you catch the best one.
In case your subject moves in bursts too, like a runner or a pet, you’ll feel more in sync and less rushed. With practice, you’ll fit right into the rhythm and shoot with calm confidence.
Capturing Action Sequences
For moving subjects, burst mode can give you a better chance at nailing the exact moment, because you’re not relying on one perfect click. You’ll capture several frames in a row, so a runner, bird, or skater has room to move into the best pose.
Keep your camera angle steady initially, then adjust it should the action shifts. That way, you stay with the subject instead of chasing it late. Also, watch background clutter before you press the shutter, since extra stuff can distract from the motion.
Use a fast shutter speed with burst mode, and keep your focus point on the lead edge of the action. Then review the sequence and pick the frame that feels alive and clean.
Stabilize Your Camera to Reduce Blur
A steady camera can make the difference between a crisp shot and a disappointing blur, especially at slower shutter speeds. Whenever you lean on tripod use, you give yourself a solid base that keeps your frame calm and your hands free to focus on timing.
In case you’re shooting handheld, image stabilization can help, but it works best as long as you still move gently and hold your breath for the moment.
- Plant your feet shoulder-width apart.
- Tuck your elbows close to your body.
- Press the shutter softly, not in a rush.
That little pause helps you feel in control, and it keeps your photo circle feeling sharp and confident. Whenever you work this way, you’re not fighting the camera. You’re joining a steady rhythm that helps your shot stay clean and clear.
Raise ISO to Maintain a Fast Shutter Speed
Should you need a fast shutter speed, raising your ISO can be the small move that saves the shot. Whenever light is thin, you can push ISO up so your camera keeps the shutter quick enough to freeze action.
That matters whenever you’re tracking a runner, bird, or kid spinning in the yard, because blur shows up fast. You might see more noise increase, but a sharp photo usually feels better than a clean blur.
Keep an eye on sensor heat too during long bursts, since it can nudge image quality down. Start with the lowest ISO that still lets you hold the speed you want. Then check your screen, trust your eye, and stay in the game with the rest of your crew.
Open Up the Aperture for More Light
As you open up the aperture, you let more light reach the sensor, and that can make a fast shutter speed much easier to hold. Once you’re trying to freeze action, a wider opening helps you keep your shot bright without forcing you to slow down.
In aperture priority, you set the f-stop, and the camera helps with the rest, so you stay in control and still feel relaxed.
- Choose a lower f-number whenever the scene feels dim.
- Pair wide apertures with the right lens selection for stronger light.
- Watch your subject and keep the exposure steady.
This simple change can help you feel ready, especially at the moment it matters and you want your image to look sharp, clean, and confident.
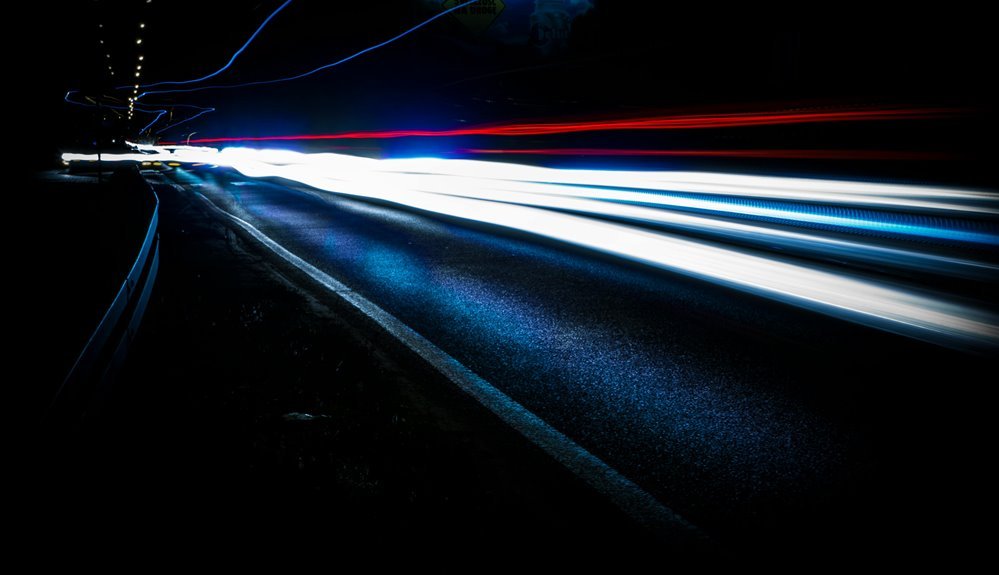
Try Panning for Controlled Motion Blur
Panning gives your photo a sense of speed while keeping your subject sharp, and that’s what makes it such a useful trick whenever you want motion to feel alive. You track the moving subject, then press the shutter and follow it smoothly with your body.
The panning technique works best whenever you keep your camera moving at the same pace as the subject, so the background turns into motion blur while the person, bike, or car stays crisp. Start off with a slower shutter speed, then adjust until the streaks look natural.
In case your initial tries feel messy, don’t worry; that’s normal, and you’re in good company. With a little practice, you’ll create photos that feel energetic, connected, and full of story.
Common Shutter Speed Mistakes to Avoid
One of the easiest shutter speed mistakes to make is choosing a speed that feels safe, but actually works against your shot. You might believe slower is kinder, yet it can invite blur, especially during your subject moves or your hands wobble.
Also, don’t ignore shutter lag, because the delay can catch you off guard at the wrong moment.
- Don’t rely on a familiar setting for every scene.
- Don’t forget that sensor sensitivity changes how much light you can keep.
- Don’t assume a sharp view means a sharp photo.
At the time you’re with other photographers, these slips happen fast, and that’s normal. So, check your speed before you press the shutter, and give yourself a better chance to get the frame you wanted.
Practice Shutter Speed in Real Situations
During the moment you practice shutter speed in real situations, the camera starts to feel less like a mystery and more like a tool you can trust. You belong in that learning curve, and every attempt teaches you something useful. Use shutter experimentation during a walk, a game, or a rainy street corner. Then notice how ever-changing lighting changes your results.
| Speed | Use | Result |
|---|---|---|
| 1/60s | Handheld | More blur |
| 1/250s | People | Clear motion |
| 1/1000s | Sports | Frozen action |
| 1/2000s | Birds | Crisp wings |
| 1/500s | Practice | Easy control |
Next, check your screen, adjust, and try again. Small wins build confidence fast. In case a shot feels off, that’s okay. You’re not behind. You’re training your eye, and your hands will catch up.
Frequently Asked Questions
How Fast Should Shutter Speed Be for Handheld Telephoto Lenses?
Aim for a shutter speed at least equal to the inverse of your focal length, so about 1/300s for a 300mm lens. Image stabilization can let you use slower speeds, but if your hands are unsteady, a faster shutter is still safer.
When Should I Use Shutter Priority Mode for Action Shots?
Use shutter priority mode when photographing fast action and you want control over shutter speed to reduce motion blur while the camera adjusts the exposure automatically. It is especially useful for sports, wildlife, and other moving subjects.
What Shutter Speed Works Best in Bright Sunlight Without Overexposing?
In bright sunlight, shutter speeds around 1/500s to 1/8000s usually work well, depending on your subject and camera. Adjust aperture and ISO to keep the exposure under control while keeping your shots sharp.
How Do Subject Size and Distance Affect Freezing Motion?
Larger subjects at close range usually need faster shutter speeds because motion stands out more clearly, and depth cues make any blur more noticeable. Smaller subjects farther away can often look sharp with slightly slower settings since their movement appears less pronounced in the frame.
When Does an ND Filter Help With Fast Shutter Speeds?
You would use an ND filter when bright light still overexposes the image even at fast shutter speeds. It cuts the incoming light, giving you more control over exposure while keeping motion crisp and highlights intact.