
Exposure compensation is a quick way to make a photo brighter or darker without changing every camera setting. It helps in tricky light like snow, bright windows, or dim rooms where the camera picks the wrong brightness. A small move up brightens the image, and a small move down darkens it. With a few taps, your shot can look much closer to what your eyes actually saw.
Understand What Exposure Compensation Does
Why do some photos come out too dark or too bright even although your camera is set to auto? You’re not doing anything wrong. Your camera uses exposure metering to guess the best light level, but tricky scenes can fool it.
That’s where exposure compensation helps you feel more in control and less left out of the results you want.
Instead of changing aperture, shutter speed, or ISO yourself, you use it for simple brightness adjustment. A positive value brightens the photo, and a negative value darkens it. These changes are measured in EV stops, often from -3 to +3.
This matters because cameras often misread snow, backlight, or dark backgrounds.
Whenever you understand exposure compensation, you join the group of photographers who shape light with confidence and intention every day.
Find Exposure Compensation on Your Camera
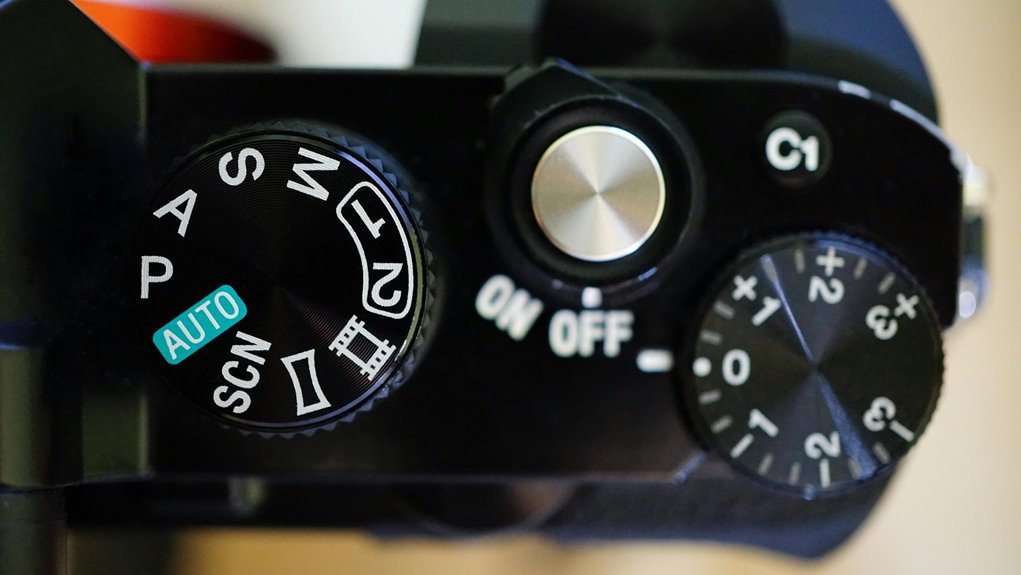
You’ll usually find exposure compensation through a +/- button and control dial, a quick menu button, or a dedicated dial on the top of your camera.
In case the symbol isn’t easy to spot, don’t worry, your camera manual or on-screen menu will point you right to it. As you adjust it, you can watch the scale change in the viewfinder or on the screen, which makes the whole process feel much less intimidating.
Common Button Locations
Where do you actually find exposure compensation as the light is changing fast and you don’t want to dig through menus? On many cameras, it sits where your thumb already rests, which is great for quick button placement and better camera ergonomics.
That means you can stay in the moment and still make the shot feel right.
- Look for a +/- symbol near the shutter button
- Check the top plate beside the main control dial
- Scan the rear thumb area near your LCD
- On some models, find a dedicated EV dial on top
- Should it not be obvious, spot the +/- icon printed on the body
Because brands place it differently, your camera might feel a little unique. Still, once you find it, you’ll feel more at home every time you shoot.
Menu And Dial Access
Once you’ve spotted the +/- symbol on your camera body, the next step is grasping how to reach it fast through the controls you already use.
On many cameras, you’ll press the +/- button and turn a command wheel. Should your camera have a dedicated dial, you can adjust brightness even faster, which feels great during the moment’s movement.
In case that shortcut isn’t obvious, menu browsing can help you find exposure compensation in the shooting settings or quick control screen. Canon users often tap the Q button near the LCD, then select the exposure scale.
As you turn the wheel, watch the viewfinder or rear screen update in real time. Pay attention to dial sensitivity, too. Some dials change in tiny 1/3-stop steps, giving you steady, confident control.
Read the Exposure Scale
As you read the exposure scale, you’ll see EV numbers that show how much brighter or darker your camera will make the photo. In case the meter indicator moves to the plus side, your image gets brighter, and in the event it shifts to the minus side, it gets darker.
Once you understand that simple scale, you’ll feel much more confident making quick fixes whenever your camera’s meter gets the scene wrong.
Understanding EV Numbers
Even though the numbers on the exposure scale look technical at initially, they’re actually simple once you know what they mean. On your ev scale, zero is the camera’s suggested brightness. Move to plus numbers, and you brighten the photo. Move to minus numbers, and you darken it.
Each EV step equals one stop of light, so the change is easy to predict.
- 0 EV means neutral exposure grounded in ev calibration
- +1 EV makes your image one stop brighter
- -1 EV makes your image one stop darker
- 1/3-step changes give you gentle, friendly control
- Most cameras show -3 to +3 EV for quick adjustments
Once you read these numbers, you’ll feel more at home with your camera, and your choices will feel confident, calm, and shared by photographers everywhere.
Meter Indicator Reading
How do you know what your camera’s meter is trying to tell you? You read the exposure scale and watch where the marker lands. When it sits at 0, the camera believes the scene matches its meter calibration. In case the marker drifts toward plus, your image will brighten. Provided it moves toward minus, it will darken. That simple indicator interpretation helps you stay in control.
As you shoot, glance at the scale in your viewfinder or on the screen. In a dark room, the meter might push you too bright. In snow, it might pull you too dark.
That’s normal, and you’re not doing anything wrong. You’re learning what every photographer in the community understands: the meter suggests, but you determine what feels right for your scene.
Know When to Use Exposure Compensation
At what point should you reach for exposure compensation instead of changing everything else? You use it whenever your camera’s lighting metering gets fooled, but you still want the ease of aperture or shutter priority instead of manual mode. It’s your quick fix whenever the photo looks off, even though your main settings already match your creative plan.
- Use it whenever the scene is brighter or darker than average.
- Try it whenever your subject stands against tricky backgrounds.
- Choose it whenever you want faster adjustments with your camera.
- Reach for it after a test shot shows the meter missed.
- Trust it whenever you like your depth or motion settings already.
That way, you stay in flow with your camera and your group of fellow shooters, making small, confident brightness corrections without rebuilding your setup from scratch.
Brighten Photos With Positive Compensation
If your subject looks too dark, especially in backlight or deep shade, you can add positive exposure compensation to lift the image and bring back the detail you meant to capture.
Start with a small increase like +1/3 or +1 EV, then check your screen so you don’t push bright areas too far and lose highlight detail. This gives you a simple, fast way to brighten the photo while still keeping whites, skies, and reflections under control.
When To Increase Exposure
Sometimes your camera sees a bright background or a mostly dark scene and decides to make everything too dim, even though your subject should look light and clear. That’s at the point you should increase exposure with positive compensation. You’re not doing anything wrong. Your meter just needs a gentle nudge so the photo matches what you saw.
- Use it for backlit faces that look too shadowy.
- Try it in low light during subjects seem muddy.
- Add +1 EV for snow, sand, or pale clothing.
- Brighten high-key scenes that should feel airy.
- Lift dark, underexposed skin tones carefully.
As you practice, you’ll notice at the moment your camera plays it too safe. A small increase, often +1/3 to +1 stop, helps your images feel more welcoming, natural, and true to the moment you wanted to share.
Preventing Overexposed Highlights
Although brightening a photo can rescue a dull subject, it can also push the lightest parts too far, which is why you need to watch highlights closely while using positive exposure compensation. As you lift exposure, check your screen, histogram, or blinkies so your community of bright tones still feels natural, not blown out. That balance protects highlight preservation while keeping shadow detail believable.
| Watch for | What you should do |
|---|---|
| Blinking whites | Reduce compensation by 1/3 EV |
| Flat bright skies | Recompose or lower exposure |
| Pale skin losing texture | Brighten less and retest |
Because you already know at what point to add light, the next step is restraint. Try +1/3 or +2/3 EV initially, then review. You don’t have to nail it instantly. Small adjustments help you stay in control and keep everyone feeling included.
Darken Photos With Negative Compensation
Should your photo look too bright, negative exposure compensation gives you a quick, gentle way to pull that brightness back under control. You don’t need to leave your favorite semi-automatic mode. Just dial down exposure in small steps, and your camera handles the rest.
This helps you protect bright details, keep whites clean, and shape mood with confidence. It’s also great for silhouette creation and night scenes, where your camera might brighten things more than you want.
- Try minus 1/3 EV initially for subtle control.
- Use minus 1 to 2 EV for bright snow or white clothes.
- Choose minus 2 or 3 EV for strong backlight silhouettes.
- Lower exposure in night scenes to keep shadows natural.
- Watch your screen or viewfinder scale so adjustments feel easy.
You’ll feel more in control, and your images will look intentional.
See How Compensation Changes Brightness
You can watch the exposure compensation scale shift from minus to plus and see your photo get darker or brighter in real time.
As you move a step like +1 EV or -1 EV, you’ll notice a clear before-and-after change on your screen or in the viewfinder. That quick visual feedback helps you trust what you’re seeing, so you can fix brightness fast without changing your main camera settings.
Exposure Compensation Scale
Because the exposure compensation scale shows brightness changes in EV stops, it gives you a quick, visual way to see what your camera will do before you take the shot. Whenever you watch the marker move left or right, you feel more in control, and that matters whenever you want your photos to match what you see.
- Zero means the meter’s standard reading.
- Positive values brighten your image.
- Negative values darken your image.
- Most cameras show a compensation range from -3 to +3 EV.
- Exposure limits vary according to camera, so check yours.
As you learn the scale, you’ll start trusting your judgment. Small 1/3-stop moves help you stay precise without touching aperture, shutter speed, or ISO.
That’s why this scale feels so friendly: it helps you belong behind the camera, not guess.
Before-And-After Brightness
How much difference can one small EV change make? More than you’d expect. Once you raise exposure compensation with +1 EV, your photo can move from dull and muddy to open and welcoming.
Drop it to -1 EV, and bright areas hold detail instead of turning chalky. That quick shift helps you make the scene feel the way you saw it.
To judge the change, use both a visual comparison and the image histogram. Side by side, you’ll observe faces brighten, skies deepen, and shadows either soften or stay rich.
On the histogram, tones slide right once you add light and left once you subtract it. As you practice, these before-and-after checks help you trust your eye. You’re not guessing anymore. You’re shaping brightness with intention, like everyone else learning to see more clearly.
Use Exposure Compensation in Aperture Priority
During the moment you’re shooting in Aperture Priority, exposure compensation becomes your quick, stress-saving way to fix brightness without giving up control of depth of field. You stay in charge of aperture effects, while the camera shifts shutter speed to match your choice.
That helps whenever the meter gets fooled by backlight, snow, or dark backgrounds. Because of priority limitations, the camera still guesses wrong sometimes, and that’s where you step in with confidence.
- Tap the +/- control and turn the dial.
- Add +EV to lift faces or light scenes.
- Use -EV to protect whites and bright areas.
- Watch the scale update in your viewfinder or screen.
- Adjust in small 1/3-stop steps, then reshoot.
You’re not guessing here. You’re learning what many photographers rely on every day, and you absolutely belong behind the camera.
Use Exposure Compensation in Shutter Priority
Once you switch to Shutter Priority, exposure compensation lets you keep control of motion while the camera adjusts aperture to make the photo brighter or darker.
That’s why this mode feels so friendly whenever you’re photographing kids, pets, sports, or street scenes. You choose the shutter speed that freezes action or shows blur, and then exposure compensation fine-tunes brightness in quick 1/3-stop steps.
In case your subject looks too dark, add positive compensation. Should highlights look harsh, pull it down. With priority metering, your camera still reads the scene, but you stay part of the creative process instead of hoping it guesses right.
This also helps whenever shutter lag makes timing stressful, because you won’t need to change settings from scratch. You’re still in charge, and your photos can match what you meant to capture.
Know When Exposure Compensation Won’t Work
Even though exposure compensation is a fast and powerful tool, it won’t do anything in full Manual mode because you’re already controlling the exposure yourself. That means your camera won’t shift shutter speed, aperture, or ISO for you.
In case you’re with other photographers, this is normal, not a mistake.
So, watch for these moments whenever the setting won’t help:
- In manual mode, you must change exposure settings yourself.
- Provided Auto ISO is off, brightness won’t change automatically.
- With off-camera flash, exposure compensation mightn’t affect flash exposure.
- In some cameras, flash and ambient light use separate controls.
- Assuming exposure is locked, compensation changes could be blocked.
Because of that, always check your mode, your meter, and your flash settings initially.
Then you’ll know what tool truly belongs in the moment.
Fix Exposure Compensation in Snow
Because snow is so bright, your camera often tries to turn it gray, and that leaves your photo looking dull, cold, and darker than the scene felt in real life. To fix snow exposure, add positive exposure compensation, usually +1 EV, then check your preview and histogram. In case the snow still looks dirty, raise it a bit more in small steps.
| Scene | Try | Result |
|---|---|---|
| Fresh snow | +1 EV | Cleaner white |
| Heavy shade | +1.3 EV | Brighter faces |
| Cloudy snowfield | +0.7 EV | Better balance |
As you practice, you’ll start to trust what you see. That’s how many photographers in your circle learn this fast. Make each exposure adjustment in 1/3-stop steps, protect texture, and keep whites bright without losing detail or making people look washed out.
Use Exposure Compensation for Backlit Subjects
During the time your subject stands in front of a bright window, sunset, or open sky, your camera often exposes for the light behind them, so the person or object turns too dark. That’s at the point you can add positive exposure compensation, usually +1 to +2 EV, to lift shadows and keep faces visible. You’re not doing anything wrong. Backlight simply tricks the meter.
To make those moments feel easier, try this:
- Start with +1 EV, then check the screen.
- Raise it more provided skin still looks muddy.
- Watch highlights so the sky doesn’t wash out.
- Use natural backlight for warm, welcoming portraits.
- Try negative compensation later for creative silhouettes.
With a few quick taps, you stay in control, and your photos feel more like the scene you shared, not what the meter guessed.
Use Exposure Compensation in Indoor Light
Once you move indoors, your camera can get confused due to lamps, window light, and dark walls all at once, so the photo often comes out dull, too bright, or strangely flat.
That’s where exposure compensation helps you feel more in control. With tricky indoor lighting, try small changes initially, like +1/3 or +2/3 EV, whenever faces look dim under artificial illumination.
In case a bright window or pale wall makes the room seem washed out, go the other way and use a little minus compensation. As you shoot, watch the preview and adjust in gentle steps. This keeps skin tones natural and the room’s mood believable.
You don’t need to leave your usual mode or change every setting. You’re simply guiding the camera, like giving a friend a helpful nudge in the right direction indoors.
Avoid Common Exposure Compensation Mistakes
Indoor practice gives you a good feel for small exposure changes, but a few easy mistakes can still trip you up once you start using compensation more often. Stay calm, because every photographer in your circle has done this too.
The biggest issue is trusting the meter in tricky scenes, where incorrect metering can push you toward the wrong setting fast.
- Don’t leave compensation on after one shot
- Check highlights to reduce overexposure risks
- Adjust in 1/3-stop steps, not giant jumps
- Recheck bright snow, sand, or backlit faces
- Review your screen and histogram together
As you move from indoor scenes to mixed light, consistency matters more. Should your image look off, pause and ask what the camera saw. Then you’ll make smarter, more confident corrections with less frustration every time.
Frequently Asked Questions
Does Exposure Compensation Affect RAW Files Differently Than JPEGS?
Yes. Exposure compensation changes the exposure used for both RAW and JPEG captures, but the result is not the same. A RAW file keeps much more image data for later editing, while a JPEG applies stronger in camera processing and compression. In practice, RAW usually gives you better highlight and shadow recovery because you are working with more original sensor information instead of a finished camera rendering.
Can Exposure Compensation Influence Autofocus Performance in Low Light?
Exposure compensation rarely increases autofocus sensitivity in low light. In most cases, it changes the recorded exposure after the camera has already focused. On some cameras, a brighter live view or viewfinder image can make composition and subject placement easier to judge, but autofocus performance itself usually stays the same.
Should I Reset Exposure Compensation After Changing Scenes?
Yes. Reset exposure compensation when you move to a new scene. Different light, subject tones, and backgrounds can make your previous setting wrong for the next shot. Metering and white balance can also change how the image looks, so starting from zero helps you avoid surprises and keeps your adjustments intentional.
Does Flash Exposure Compensation Work the Same as Exposure Compensation?
Yes, but they affect different parts of the exposure. Flash exposure compensation changes the flash output based on flash metering, while regular exposure compensation adjusts the ambient light exposure. Used together, they let you control how the subject and background are balanced in the final image.
Can Exposure Compensation Drain Battery Life Faster?
Exposure compensation by itself has very little effect on battery life. Battery drain is more likely to increase if you spend time reviewing photos, keep live view active, or shoot extra test frames while adjusting exposure.